HEROJOON 블로그(히로블)
Spring Boot 프로젝트에서 Vuejs 한번에 빌드하기 본문
last update: 2022-04-14
아래 예제 코드: https://github.com/herojoon/vuejs-app
환경
- Spring Framework: Spring Boot 2.6.6
- Build: Gradle 6.9.2
- Java: JDK 11
- Front: Vue 2 / Node.js 14.17.6 / NPM 6.14.15
목표
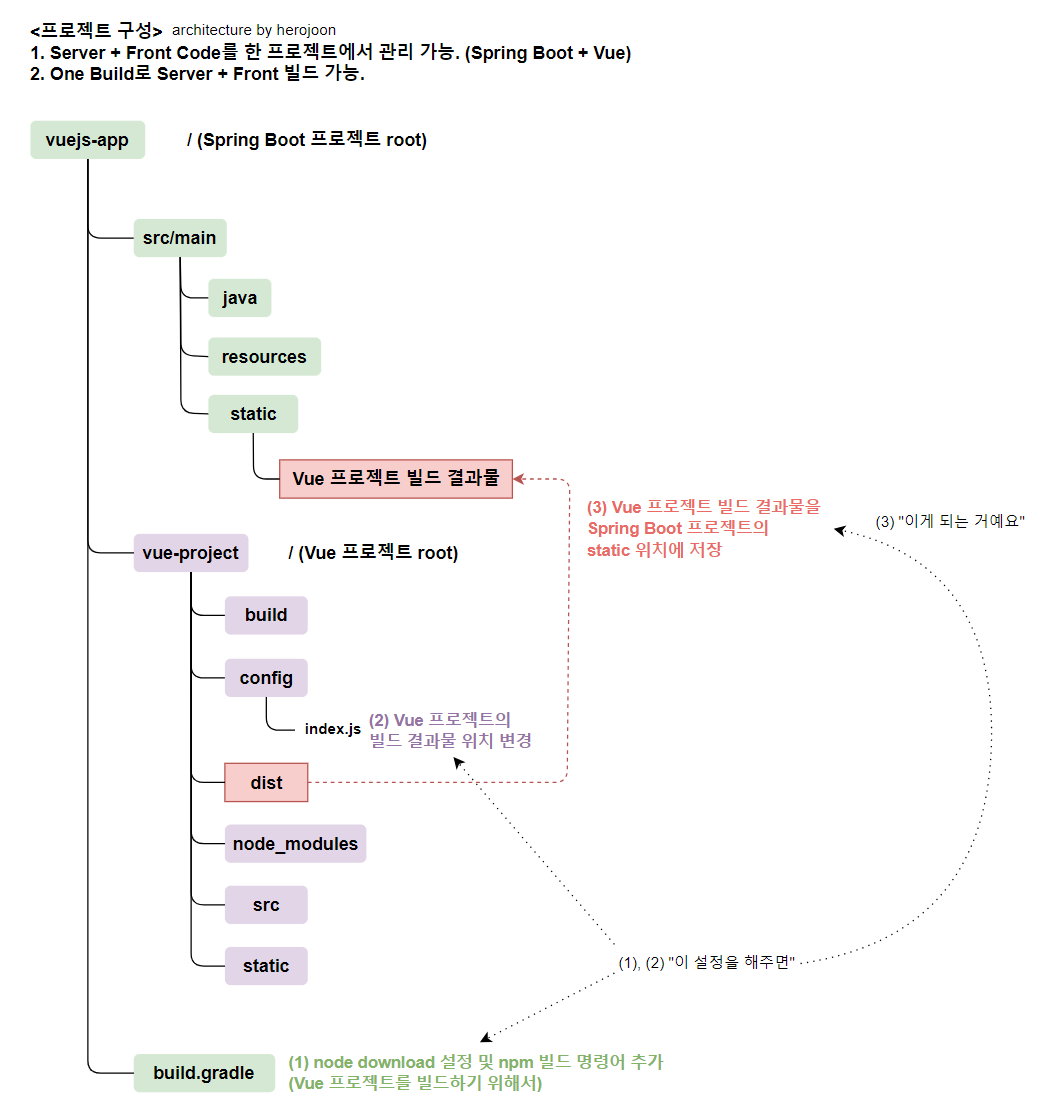
Spring Boot + Vue를 하나의 프로젝트로 관리하고자 할때 One Build가 가능하도록 프로젝트를 구성할 수 있습니다.
결론적으로 gradle build 명령어를 통해 Spring Boot + Vue 프로젝트의 빌드를 한번에 할 수 있도록 프로젝트를 구성할 것입니다.
<One Build 관리의 이점>
- Backend API와 Front 코드를 여러 프로젝트로 관리하기 번거로울 경우 하나의 프로젝트로 깔끔하게 관리할 수 있습니다. 환경 구성을 단일로 할 수 있고, 배포를 한 번에 할 수 있기 때문에 관리 편의성이 좋습니다.
- Backend API와 Front 코드의 버저닝 관리를 간편하게 할 수 있습니다. 프로젝트가 하나이기 때문에 commit된 코드는 서로의 호환성을 보장할 것이기 때문입니다. 버전 관리를 별도로 가져가고 싶다면 프로젝트를 나누어 관리해도 됩니다. 만약 두 프로젝트로 별도 관리할 경우에는 배포시에 서로의 호환 버전을 맞추기 위한 고려가 필요합니다.
할 것 설명
Spring Boot는 기본적으로 src/main/static/ 위치에 있는 index.html파일을 읽을 수 있도록 제공하기 때문에
Vue 빌드 파일들을 src/main/static/ 위치에 이동시켜 놓으면 기본 localhost:8080(Root)로 접근했을 때 index.html을 띄울 수 있게 됩니다.
하나의 프로젝트에서 Spring Boot + Vue 프로젝트를 함께 띄울 수 있게 되는 거죠.
그래서 우리가 해야하는 일은
Vue 프로젝트를 빌드해서 빌드 결과물이 src/main/static/ 위치에 떨궈지도록 하자. 입니다.
이 작업은 Spring Boot 프로젝트를 빌드하는 시점에 함께 진행되도록 설정해주면 더 좋겠죠.
Spring Boot 프로젝트는 gradle build 명령어를 통해 빌드를 할 건데요.
그래서 gradle build명령어를 통해 Vuejs 프로젝트 빌드도 함께 이뤄지도록 build.gradle에 설정정보를 추가할거예요.
할 것 요약
(1) Spring Boot 프로젝트/build.gradle에 node download 설정 및 npm 빌드 명령어 추가
-> Vue 프로젝트에서 node와 npm을 이용하여 프로젝트를 빌드하기 때문에 이 부분을 Spring Boot 프로젝트 빌드하는 부분에 설정하 여 함께 빌드 되도록 하는 것입니다.
(2) Vue 프로젝트/config/index.js에 Vue 프로젝트의 빌드 결과물 위치 변경 설정
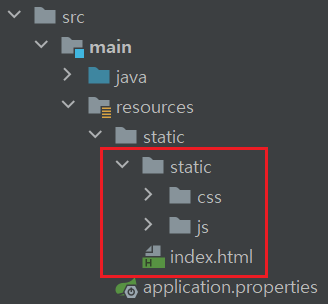
(3) Vue 프로젝트 빌드 결과물이 Spring Boot 프로젝트 static 위치에 잘 생성되는지 확인
추가적으로...!! (이 부분은 하고 싶으신 분 하세요.)
(4) Spring Boot 프로젝트에서 Vue 프로젝트의 hash mode path를 history mode path로 사용 가능하도록 설정

해보기
(1) Spring Boot 프로젝트/build.gradle에 node download 설정 및 npm 빌드 명령어 추가
추가한 설정 위에는 /** vue-project를 build하기 위한 설정 **/ 주석을 작성해놓았습니다.
- Node Plugin Guild 참고: https://github.com/node-gradle/gradle-node-plugin/blob/3.2.1/docs/usage.md
plugins {
    id 'org.springframework.boot' version '2.6.6'
    id 'io.spring.dependency-management' version '1.0.11.RELEASE'
    id 'java'
    id 'war'
    /**
     * vue-project를 build하기 위한 설정
     * - node gradle plugin 추가
     */
    id "com.github.node-gradle.node" version "3.0.1"
}

group = 'com.herojoon'
version = '0.0.1-SNAPSHOT'
sourceCompatibility = '11'

println "### project.projectDir: ${project.projectDir}"

/**
 * vue-project를 build하기 위한 설정
 * - node gradle plugin의 node 설정 추가
 */
node {
    /**
     * 특정 Node.js 버전을 다운로드 및 설치 할 지 여부
     * true: 다운로드 및 설치
     * false: 전역으로 설치된 Node.js 사용함.
     */
    download = true

    /**
     * download가 true일 경우에만 사용
     * version에 명시한 버전으로 Node.js 다운로드 및 설치
     * workDir에 설치됨
     */
    version = "14.17.6"

    /**
     * 사용할 npm 버전을 지정하면 npmWorkDir에 설치됨
     * npm 버전을 지정하지 않으면 Node.js에 번들로 제공되는 npm 버전으로 사용됨
     */
    npmVersion = "6.14.15"

    /**
     * download가 true일 경우에만 사용
     * Node.js 배포를 가져오기 위한 기본 URL
     */
    distBaseUrl = "https://nodejs.org/dist"

    /**
     * npmInstall 작업에 의해 실행되는 npm 명령
     * 기본적으로 설치되지만 ci로 변경할 수 있음
     */
    npmInstallCommand = "install"

    /**
     * download가 true일 경우에만 사용
     * Node.js가 압축 해제된 디렉토리
     */
    workDir = file("${project.projectDir}/.gradle/nodejs")

    /**
     * npm이 설치된 디렉토리 (특정 버전이 정의된 경우)
     */
    npmWorkDir = file("${project.projectDir}/.gradle/npm")

    /**
     * vue 프로젝트 디렉토리 위치
     * package.json 파일과 node_modules 디렉토리가 있는 곳
     * "저는 프로젝트 Root 아래 vue 프로젝트를 생성하였으므로 아래와 같이 주소를 작성해주었습니다."
     */
    nodeProjectDir = file("${project.projectDir}/vue-project")

    // Whether the plugin automatically should add the proxy configuration to npm and yarn commands
    // according the proxy configuration defined for Gradle
    // Disable this option if you want to configure the proxy for npm or yarn on your own
    // (in the .npmrc file for instance)
    nodeProxySettings = ProxySettings.SMART
}

configurations {
    compileOnly {
        extendsFrom annotationProcessor
    }
}

repositories {
    mavenCentral()
    /**
     * vue-project를 build하기 위한 설정
     * - node gradle 추가
     */
    gradlePluginPortal()
}

dependencies {
    implementation 'org.springframework.boot:spring-boot-starter-web'
    compileOnly 'org.projectlombok:lombok'
    annotationProcessor 'org.projectlombok:lombok'
    providedRuntime 'org.springframework.boot:spring-boot-starter-tomcat'
    testImplementation 'org.springframework.boot:spring-boot-starter-test'
}

/**
 * vue-project를 build하기 위한 설정
 * - node gradle 추가
 */
apply plugin: 'com.github.node-gradle.node'

/**
 * vue-project를 build하기 위한 설정
 * - vue-project의 기존 빌드 결과물을 제거하기 위한 task
 */
task deleteVueBuildFiles(type: Delete) {
    delete "src/main/resources/static/static", "src/main/resources/static/index.html", "${project.projectDir}/vue-project/node_modules"
}

/**
 * vue-project를 build하기 위한 설정
 * - vue-project를 빌드하기 위한 npm build task
 *
 * dependsOn에 'deleteVueBuildFiles', 'npmInstall' task 정보를 지정하였으므로
 * npmBuild task는 위 두 task에 의존한다는 것이고,
 * npmBuild가 실행되기 전 위 두 task가 차례대로 먼저 실행됩니다.
 * deleteVueBuildFiles task는 빌드 결과물을 제거하기 위하여 별도 만든 task이고,
 * npmInstall task는 node plugin에서 제공하는 task입니다.
 */
task npmBuild(type: NpmTask, dependsOn: ['deleteVueBuildFiles', 'npmInstall']) {
    args = ["run", "build"]
}

/**
 * vue-project를 build하기 위한 설정
 * node gradle에서 제공하는 npmInstall task를 어느 시점에 실행시켜 줄지 지정해주는 것입니다.
 * "gradle build 시 수행되는 processResources task가 실행되기 전에 npmBuild task를 실행하라"
 *
 * 그리고 npmBuild task의 의존으로 deleteVueBuildFiles, npmInstall task가 있으므로,
 * "npmBuild task가 실행하기 전에 deleteVueBuildFiles, npmInstall task를 순서대로 실행하라."
 *
 * 정리한 task 실행 순서는
 * 1) deleteVueBuildFiles
 * 2) npmInstall
 * 3) npmBuild
 * 4) processResources
 * 입니다.
 */
processResources.dependsOn 'npmBuild'

tasks.named('test') {
    useJUnitPlatform()
}
(2) Vue 프로젝트/config/index.js에 Vue 프로젝트의 빌드 결과물 위치 변경 설정
// 변경 전
build: {
    // Template for index.html
    index: path.resolve(__dirname, '../dist/index.html'),  // 변경 전

    // Paths
    assetsRoot: path.resolve(__dirname, '../dist'),  // 변경 전
    assetsSubDirectory: 'static',
    assetsPublicPath: '/',


// 변경 후
build: {
    // Template for index.html
    index: path.resolve(__dirname, '../../src/main/resources/static/index.html'),  // 변경 후 - Vue 프로젝트의 빌드 결과물 위치 변경 설정

    // Paths
    assetsRoot: path.resolve(__dirname, '../../src/main/resources/static'),  // 변경 후 - Vue 프로젝트의 빌드 결과물 위치 변경 설정
    assetsSubDirectory: 'static',
    assetsPublicPath: '/',
(3) Vue 프로젝트 빌드 결과물이 Spring Boot 프로젝트 static 위치에 잘 생성되는지 확인
Vue 프로젝트 dist폴더 아래 생성되었던 빌드 결과물들이 Spring Boot 프로젝트 static폴더에 잘 생성된 것을 확인할 수 있습니다.
<확인 방법>
- (index.js설정에 대한 확인) Vue 프로젝트에서 npm run build 명령어를 입력 하면 index.js에 설정한 경로로 빌드 결과물이 생성되는 것을 확인 할 수 있습니다.
- (build.gradle과 index.js설정 모두에 대한 확인) Spring Boot 프로젝트에서 gradle build 명령어를 입력하면 build.gradle파일에 정의된 npmBuild task가 실행되면서 해당 task에 정의된 npm run build 명령어를 실행시켜 줍니다. 그리고 index.js에 설정한 경로로 빌드 결과물이 생성되어 집니다.

Spring Boot 프로젝트를 실행해보시면 http://localhost:8080 (/ root)으로 접근 시 아래처럼 Vue 프로젝트의 화면이 호출됩니다.
그런데 뒤에 /#/라는 값이 path에 붙어 있습니다. 이것은 Vue 프로젝트의 router 설정 default가 hash mode로 되어 있기 때문입니다.
<Vue 프로젝트 router path mode>
- hash mode: 도메인 뒤 path에 /#/가 붙습니다. ex) http://localhost:8080/#/web/book/list
- history mode: 도메인 뒤 path에 /#/가 붙지 않습니다. ex) http://localhost:8080/web/book/list

만약 Spring Boot + Vue 프로젝트에서 Vue router history mode를 사용하고 싶다면 아래와 같이 설정하세요.
(4) Spring Boot 프로젝트에서 Vue 프로젝트의 hash mode path를 history mode path로 사용 가능하도록 설정
(4-1) Vue 프로젝트/src/router/index.js 파일에 history mode로 설정
export default new Router({
  mode: 'history',  // mode를 history로 추가합니다.
  routes: [
    {
      path: '/',
      name: 'Main',
      component: Main
    },
(4-2) Spring Boot에서 View Mapping을 위한 Controller 추가.
-> Spring Boot에서 사용하는 Controller의 RequestMapping주소 접근 시, Server의 API를 호출하는 것인지 Vue 프로젝트의 View를 호출하는 것인지 구분이 필요하기 때문에 이를 위한 Controller를 추가해줍니다.
이렇게 사용할 경우에는
- Vue 프로젝트의 router에서는 sub path를 구분할 수 있도록 맞추어 주고,
- Controller에서는 Vue 프로젝트에서 맞추어준 sub path 접근 시, View Mapping을 해주도록 하면
API와 충돌 없이 사용할 수 있습니다.
예시)
Vue 프로젝트/src/router/index.js 파일
| import Vue from 'vue' import Router from 'vue-router' import Main from '@/components/Main' import BookList from '@/components/BookList' import WriterList from '@/components/WriterList' Vue.use(Router) export default new Router({ mode: 'history', routes: [ { path: '/', // 루트를 제외한 나머지 path를 name: 'Main', component: Main }, { path: '/web/book/list', // 구분을 위한 sub path로 앞을 맞춰줍니다. name: 'BookList', component: BookList }, { path: '/web/writer/list', // 구분을 위한 sub path로 앞을 맞춰줍니다. name: 'WriterList', component: WriterList } ] }) |
Controller 코드
| package com.herojoon.vuejsapp.controller; import org.springframework.stereotype.Controller; import org.springframework.web.bind.annotation.RequestMapping; /** * Web Mapping Controller */ @Controller public class WebController { /** * Vue Project * * @return */ @RequestMapping(value = {"/", "/web/**"}) // 루트 (index.html을 위해) 혹은 web 접근시에 Vue 프로젝트의 view 호출 public String viewMapping() { return "forward:/index.html"; } } |
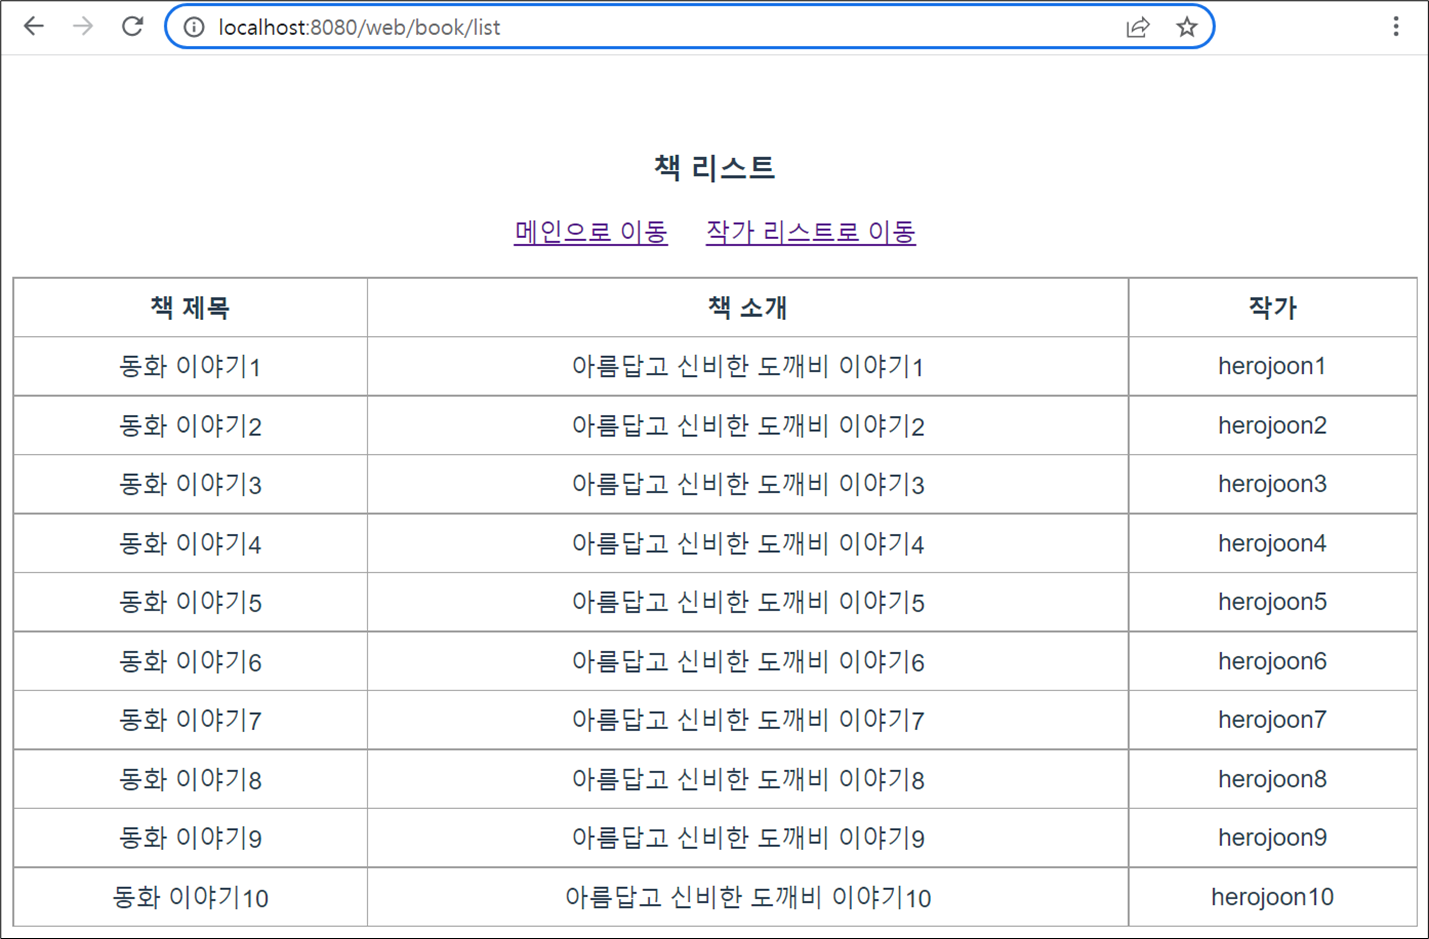
위 설정 후 실행결과, /#/ 값 없이 view가 잘 호출되었습니다.

'Backend' 카테고리의 다른 글
| 알파벳 아스키 코드(Alphabet ASCII Code) (2) | 2021.02.01 |
|---|---|
| Android [Service took too long to process intent: com.google.android.c2dm.intent.RECEIVE App may get closed.]해결하기 (0) | 2020.03.17 |
| FCM 서버 프로토콜을 이용한 Push 전송 (6) | 2020.03.05 |
| Firebase Admin SDK를 이용한 Push 전송 (0) | 2020.03.05 |
| 성능 테스트 시 고려할 점 (2) | 2020.03.04 |


